DIY BEGINNER PROJECT NO.9 (HELICOPTER – LET’S MAKE IT SPIN!)

Helicopter | Project Repository
PROJECT REPOSITORY

Helicopter โ€“ Let’s Make It Spin! โค๏ธ

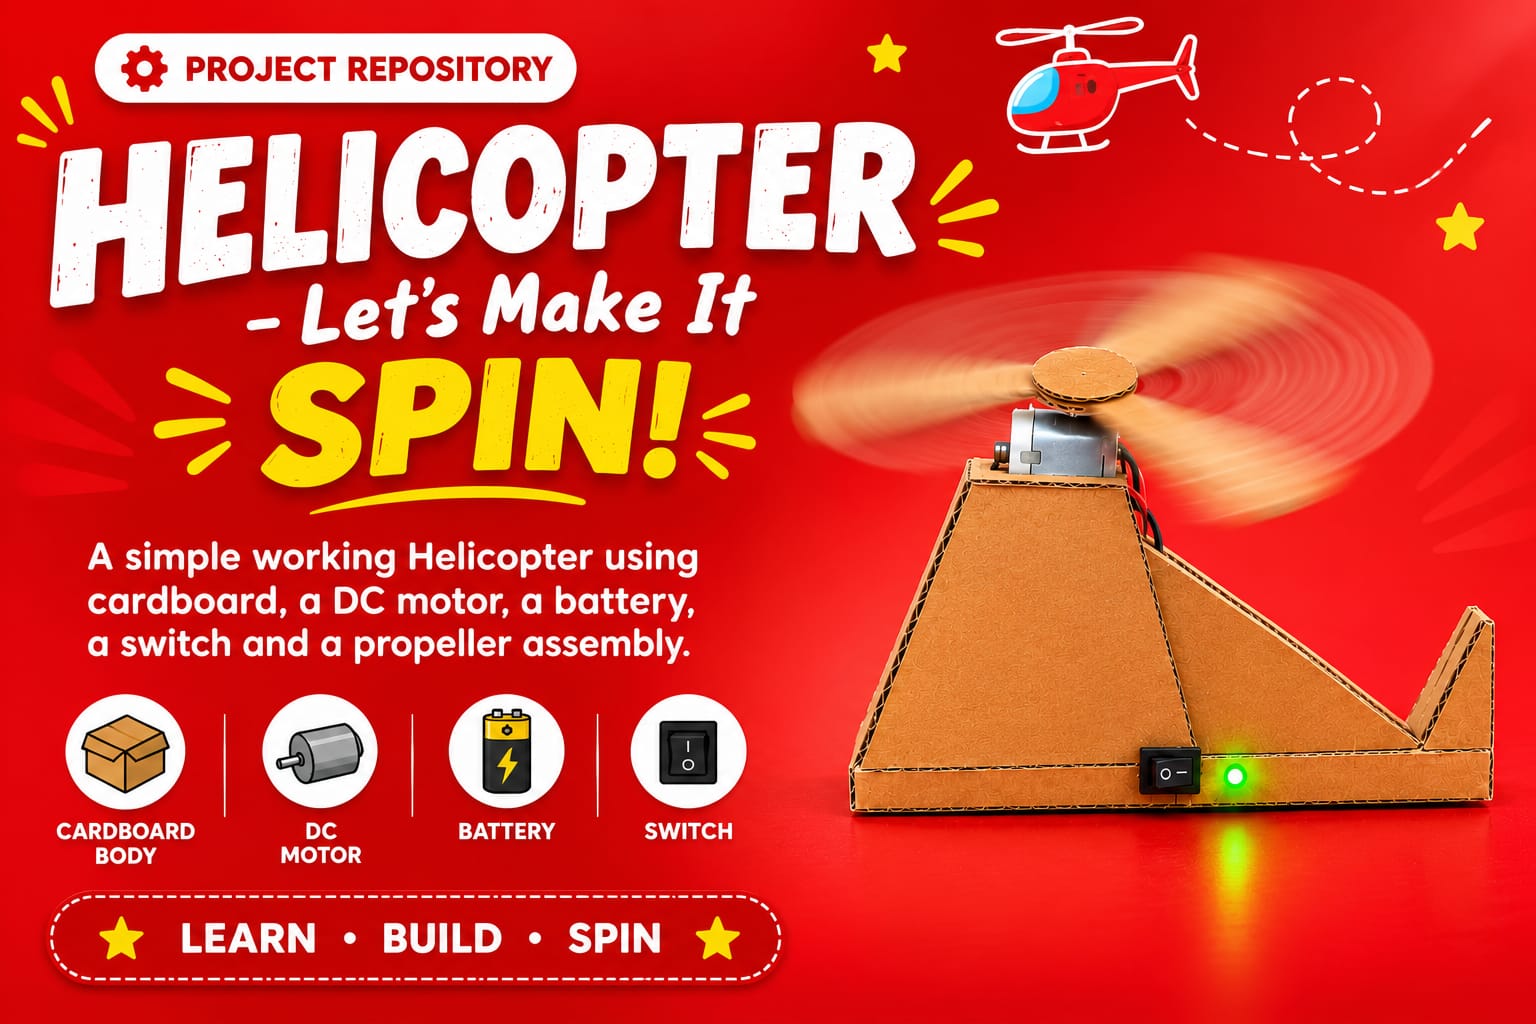
Build a simple working Helicopter using cardboard, a DC motor, a battery, a switch, and a propeller assembly. When the switch is turned ON, the motor rotates the propeller and demonstrates how electrical energy can be converted into mechanical movement.

Note: Please read the full instructions before making the project.

Category

DIY Electronics & Mechanical Project

Level

Beginner

TABLE OF CONTENTS

AIM

To build a simple working helicopter model using cardboard, a DC motor, a battery, and a propeller assembly.

OBJECTIVE

This project introduces students to the basics of:

  • Building a simple working model
  • Using a DC motor
  • Understanding battery connections
  • Understanding switch operation
  • Making a rotating propeller
  • Connecting a motor to a power source
  • Constructing a functional model using cardboard
  • Testing and troubleshooting a simple motor-powered model

MATERIALS REQUIRED

Material Quantity / Measurement
DC Motor1
CardboardAs required
Battery1
Battery Connector1
Switch1
Glue / Fevicol / Glue GunFor fixing
Scissors / CutterAs needed
Circles for the propeller assembly2
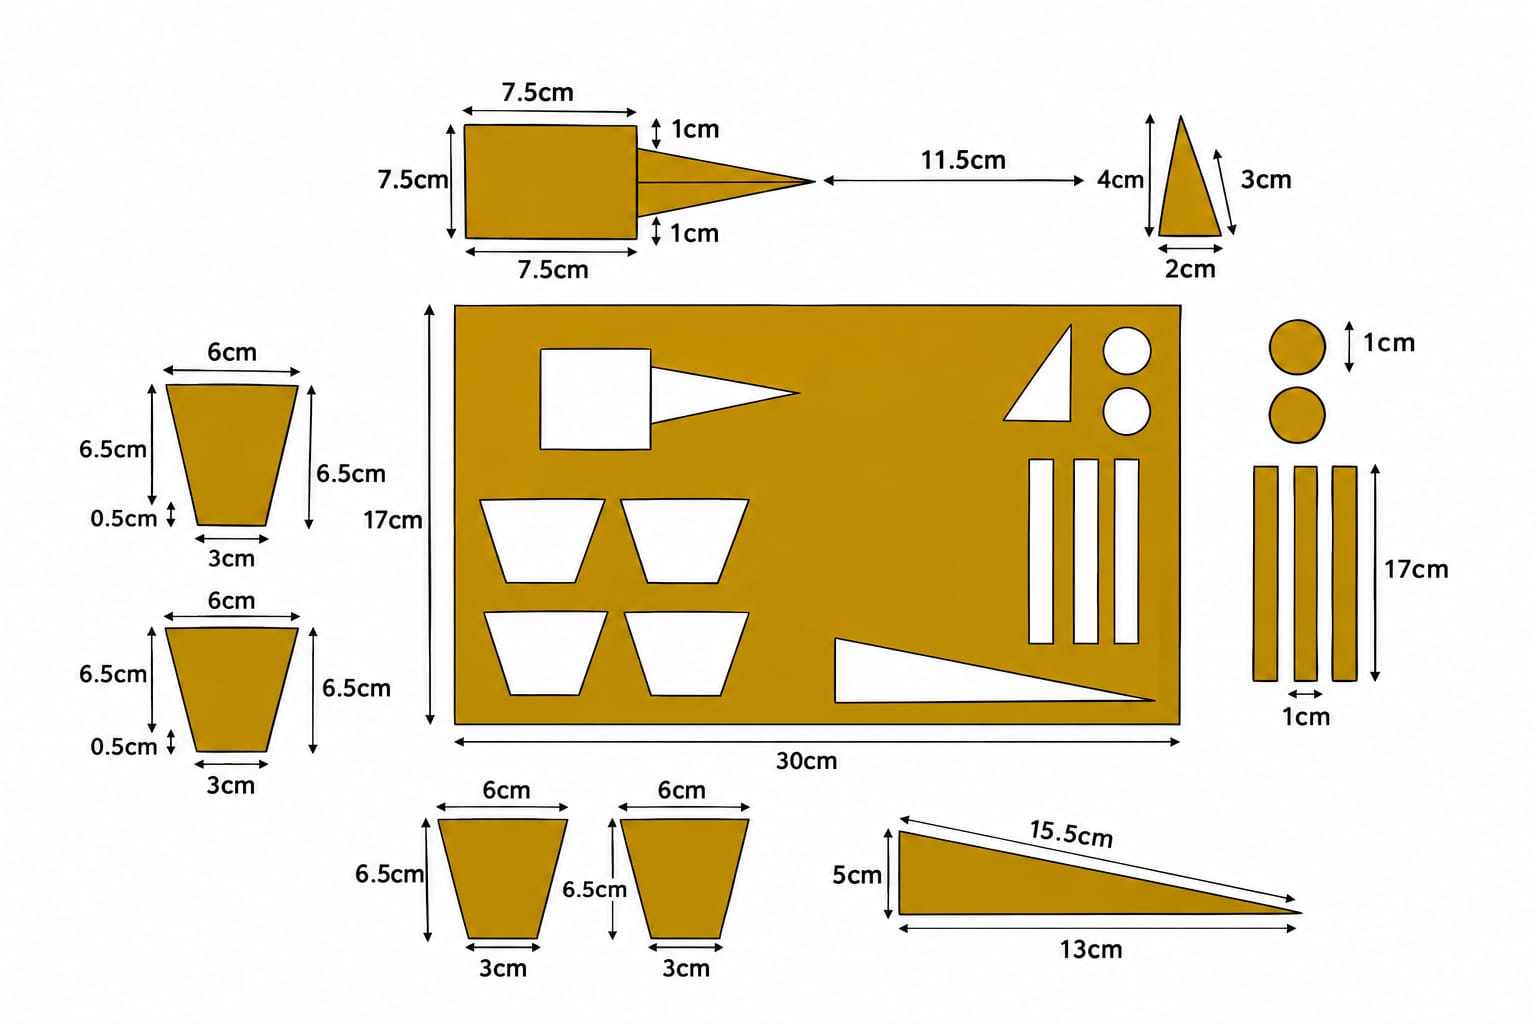
Sticks3 pieces, 17 cm ร— 1 cm each
Triangular pieces for the funnel structure4 pieces; measurements listed as 6 cm, 6.5 cm and 3 cm
Big triangles2 pieces, 15 cm ร— 13 cm
Small triangles2 pieces, 4 cm ร— 3 cm

๐Ÿ’ก PREPARATION TIP

  • Prepare and organize all cardboard pieces before assembly.
  • Measure and mark cutting lines with a pencil and ruler.
  • Ask an adult to help with sharp tools.

CIRCUIT DESIGN CONCEPT

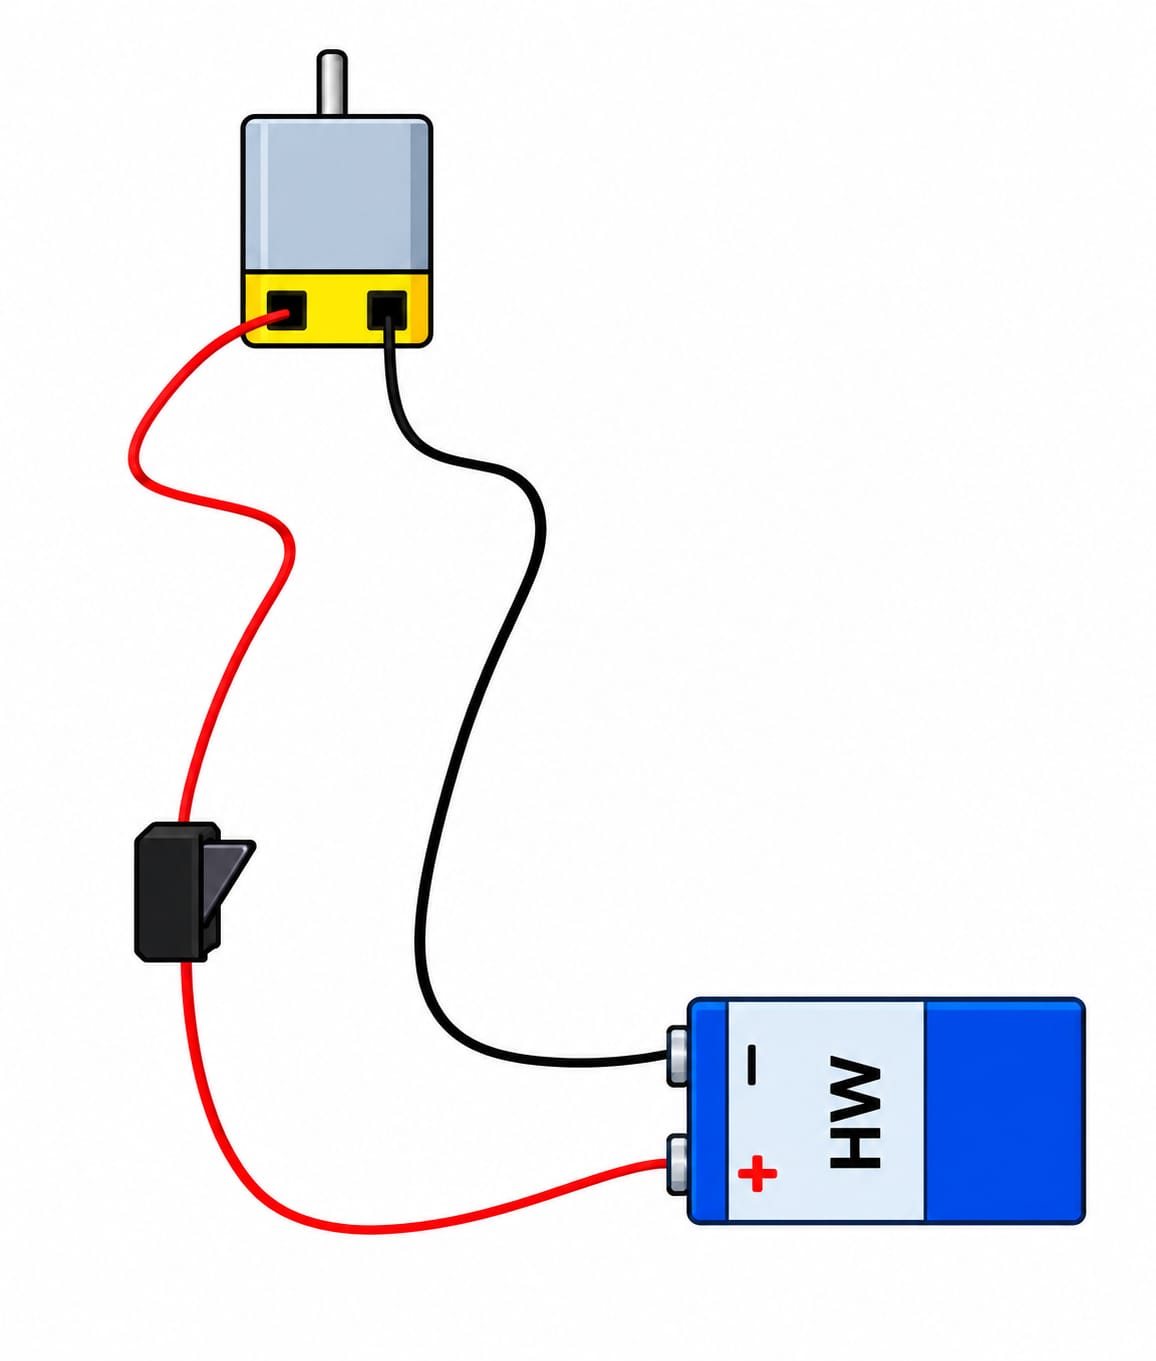
  • The Helicopter uses a simple series circuit to power the DC motor.
  • The battery provides electrical energy to the circuit. When the switch is turned ON, the circuit is completed and current flows through the motor.
  • The DC motor converts electrical energy into mechanical rotation, which rotates the connected propeller.

Current Flow:

Battery (+) โ†’ Battery Connector โ†’ Switch โ†’ DC Motor โ†’ Battery (โ€“)

  • Switch ON: Circuit complete โ†’ Motor rotates โ†’ Propeller rotates.
  • Switch OFF: Circuit open โ†’ Motor stops โ†’ Propeller stops.

PROCEDURE

Follow the steps below carefully to assemble and test the Helicopter.
STEP 1

PREPARE THE CARDBOARD PIECES

  • Take a suitable piece of cardboard as the base.
  • Cut the cardboard pieces according to the shapes and measurements required for the helicopter model.
  • Keep all the cut pieces ready before starting the assembly.

๐Ÿ’ก TIP

  • Measure the cardboard pieces carefully before cutting.
  • Mark the cutting lines with a pencil or ruler first.
  • Keep the pieces organized according to their size and shape.

๐Ÿ”„ ALTERNATIVE

  • Thick cardboard can be used to make the model stronger.
  • If the cardboard is thin, two layers can be joined together for better support.

Step 1. Prepare the Cardboard Pieces
STEP 2

MAKE THE FUNNEL STRUCTURE

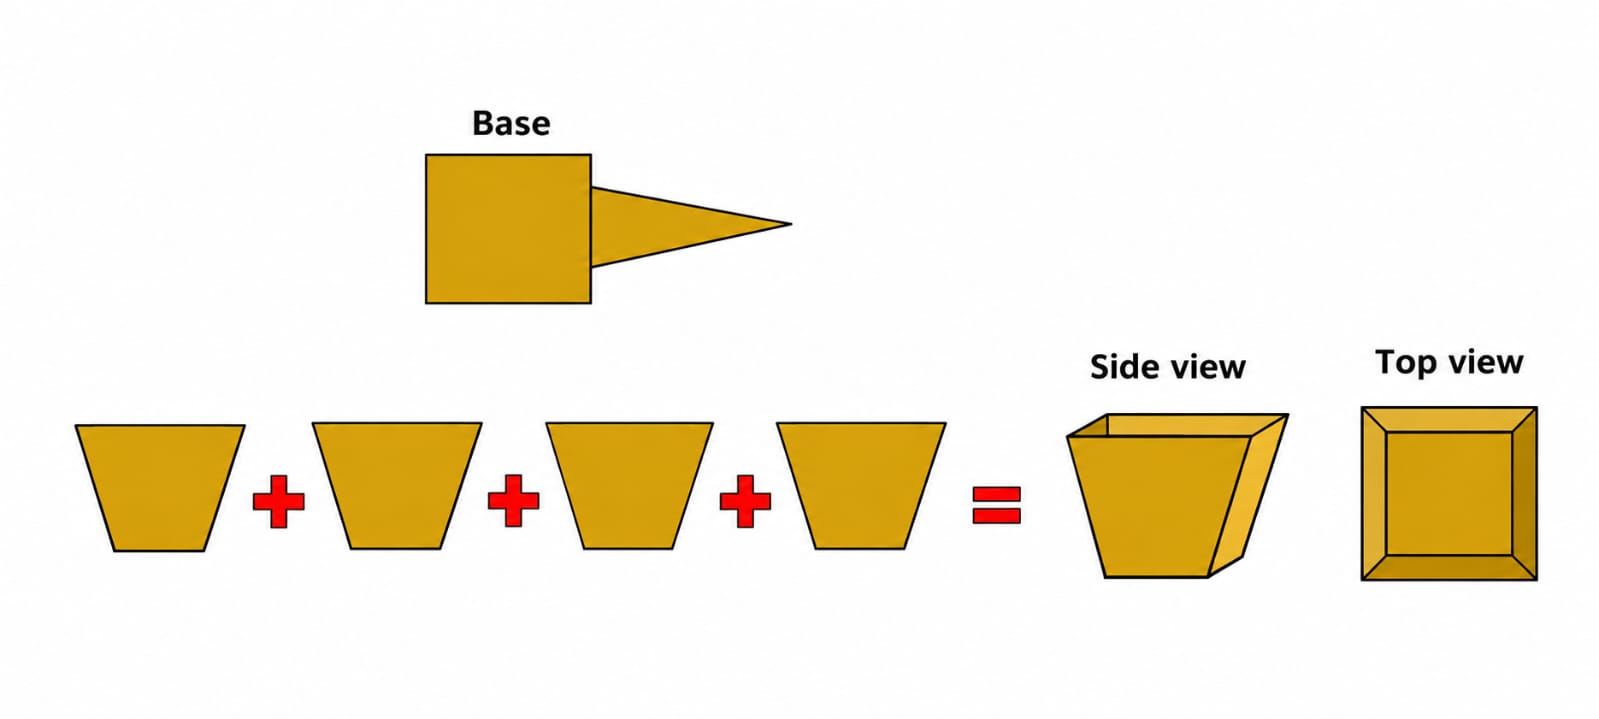
  • Take the base.
  • Take the four triangular pieces listed for the funnel structure (measurements: 6 cm, 6.5 cm and 3 cm).
  • Group the triangular pieces together.
  • Glue the pieces together to form a funnel-shaped structure.
  • Allow the glue to dry properly.

๐Ÿ’ก TIP

  • Align the triangular pieces carefully before applying glue.
  • Make sure the funnel structure is stable and firmly attached.
  • Do not use too much glue, as it can make the cardboard soft.

๐Ÿ”„ ALTERNATIVE

  • Use thicker cardboard for the funnel structure.
  • Add a small cardboard support inside the funnel if additional strength is needed.

Step 2. Make the Funnel Structure

STEP 3

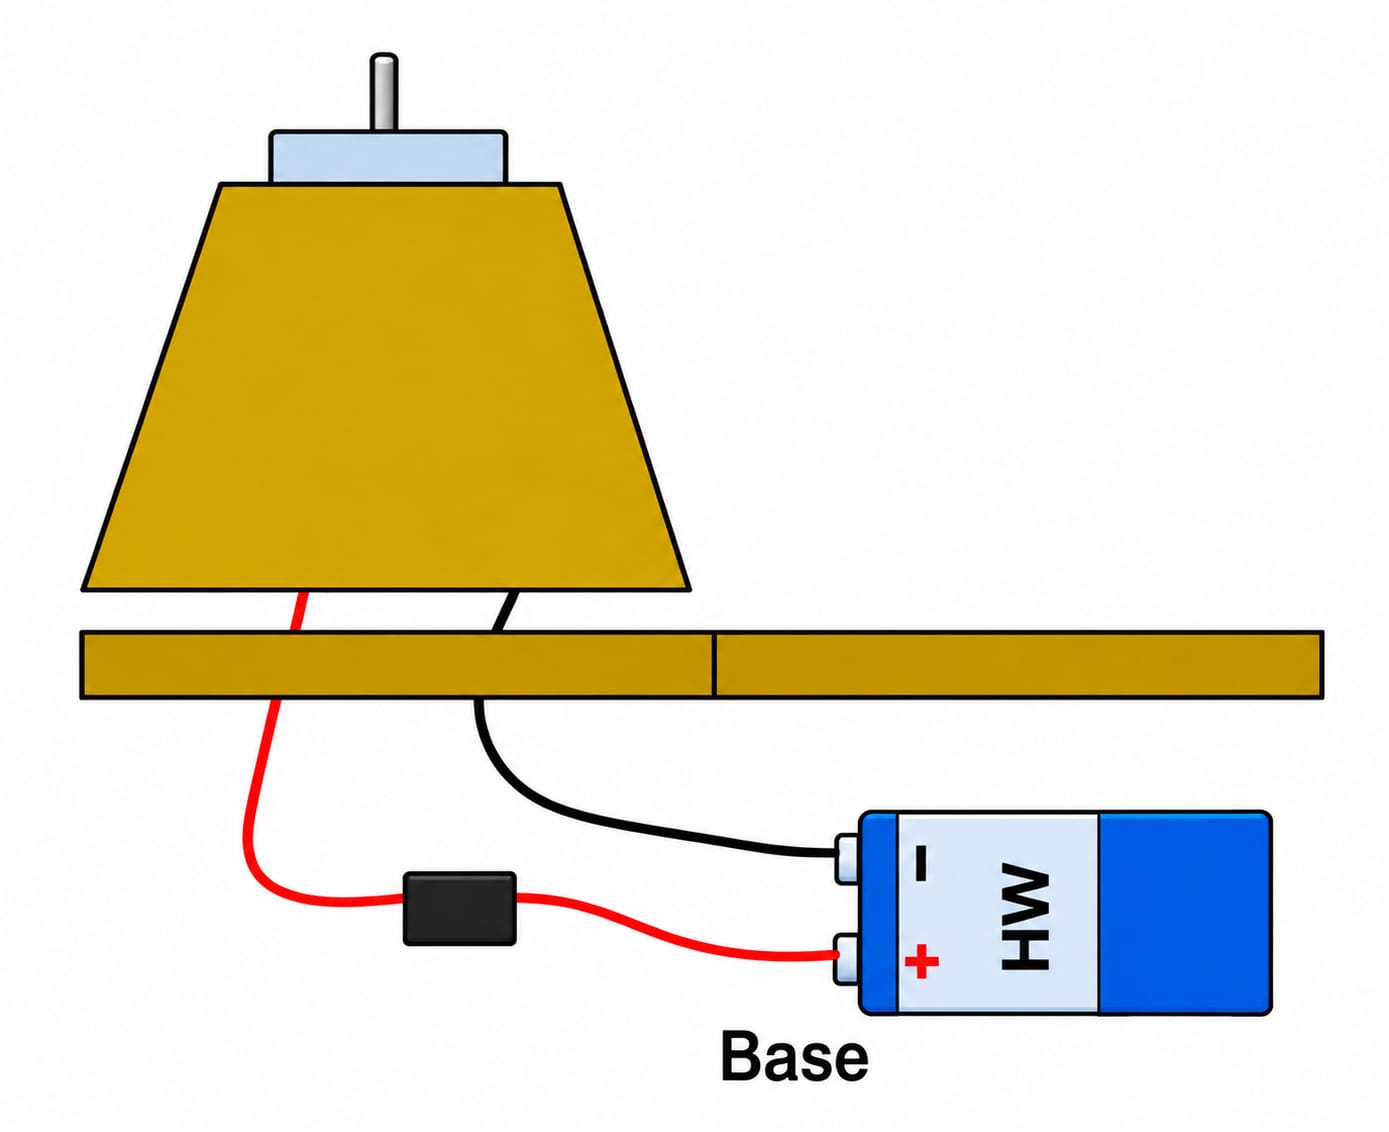
CONNECT THE MOTOR, BATTERY CONNECTOR & SWITCH

  • Take the DC motor, battery connector, and switch.
  • Connect the motor to the battery connector through the switch.
  • Make sure the connections are secure.
  • Keep the wires arranged away from the rotating part of the motor.

๐Ÿ’ก TIP

  • Check the connections before fixing the motor permanently.
  • Keep the wires short and neatly arranged where possible.
  • Do not allow loose wires to come in contact with the rotating propeller.

๐Ÿ”„ ALTERNATIVE

  • Insulation tape can be used to secure exposed wire connections.
  • The wires can be secured to the cardboard using small pieces of tape.

Step 3. Connect the Motor, Battery Connector & Switch
STEP 4

FIX THE MOTOR ASSEMBLY

  • Take the prepared base.
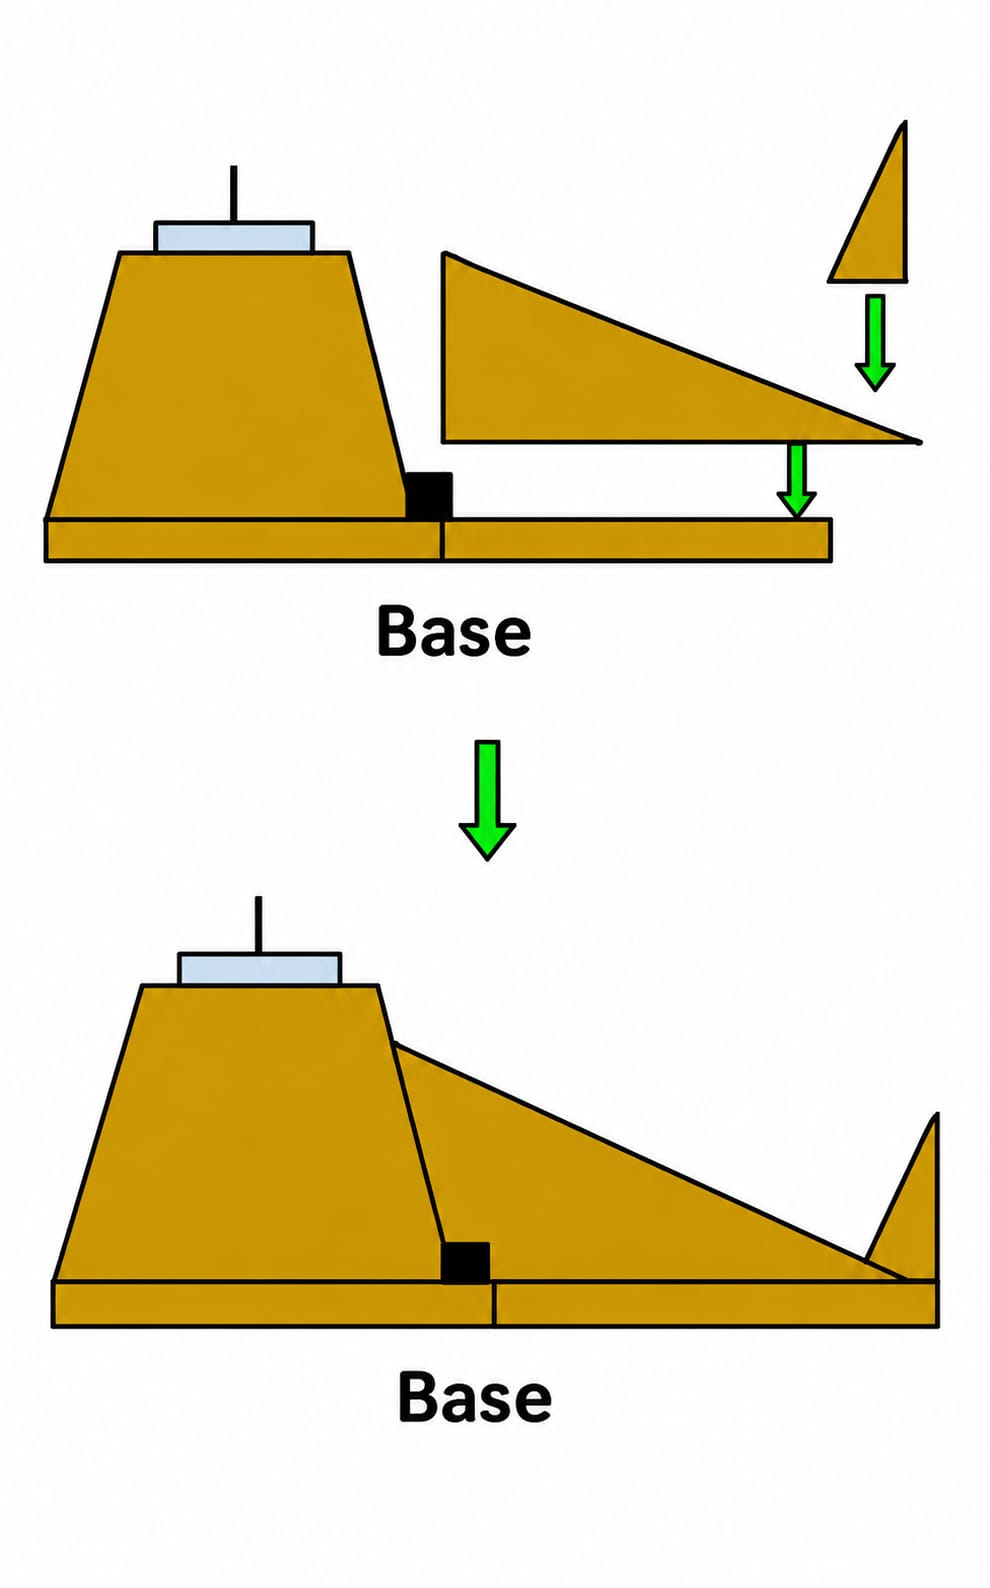
  • Glue the triangular funnel structure onto the base.
  • Place the DC motor on the funnel structure.
  • Fix the motor securely in position.
  • Allow the glue to dry before continuing.

๐Ÿ’ก TIP

  • Make sure the motor is positioned firmly and does not move when it rotates.
  • Keep the motor aligned with the propeller shaft.
  • Test the motor position before applying a large amount of glue.

๐Ÿ”„ ALTERNATIVE

  • Additional cardboard supports can be added around the motor.
  • A small cardboard holder can be made to keep the motor in position.

Step 4. Fix the Motor Assembly

STEP 5

ATTACH THE MAIN BODY TRIANGLES

  • Take the two big triangles measuring 15 cm ร— 13 cm.
  • Take the two small triangles measuring 4 cm ร— 3 cm.
  • Join the required triangle pieces together.
  • Fix them onto the base.
  • Make sure the body pieces are properly aligned.

๐Ÿ’ก TIP

  • Check that both sides are balanced before fixing them permanently.
  • Apply glue along the edges for a stronger joint.
  • Allow each joint to dry before moving the model.

๐Ÿ”„ ALTERNATIVE

  • Add small cardboard strips along the joints for additional support.
  • Decorative paper can be added after the structure is completely assembled.

Step 5. Attach the Main Body Triangles
STEP 6

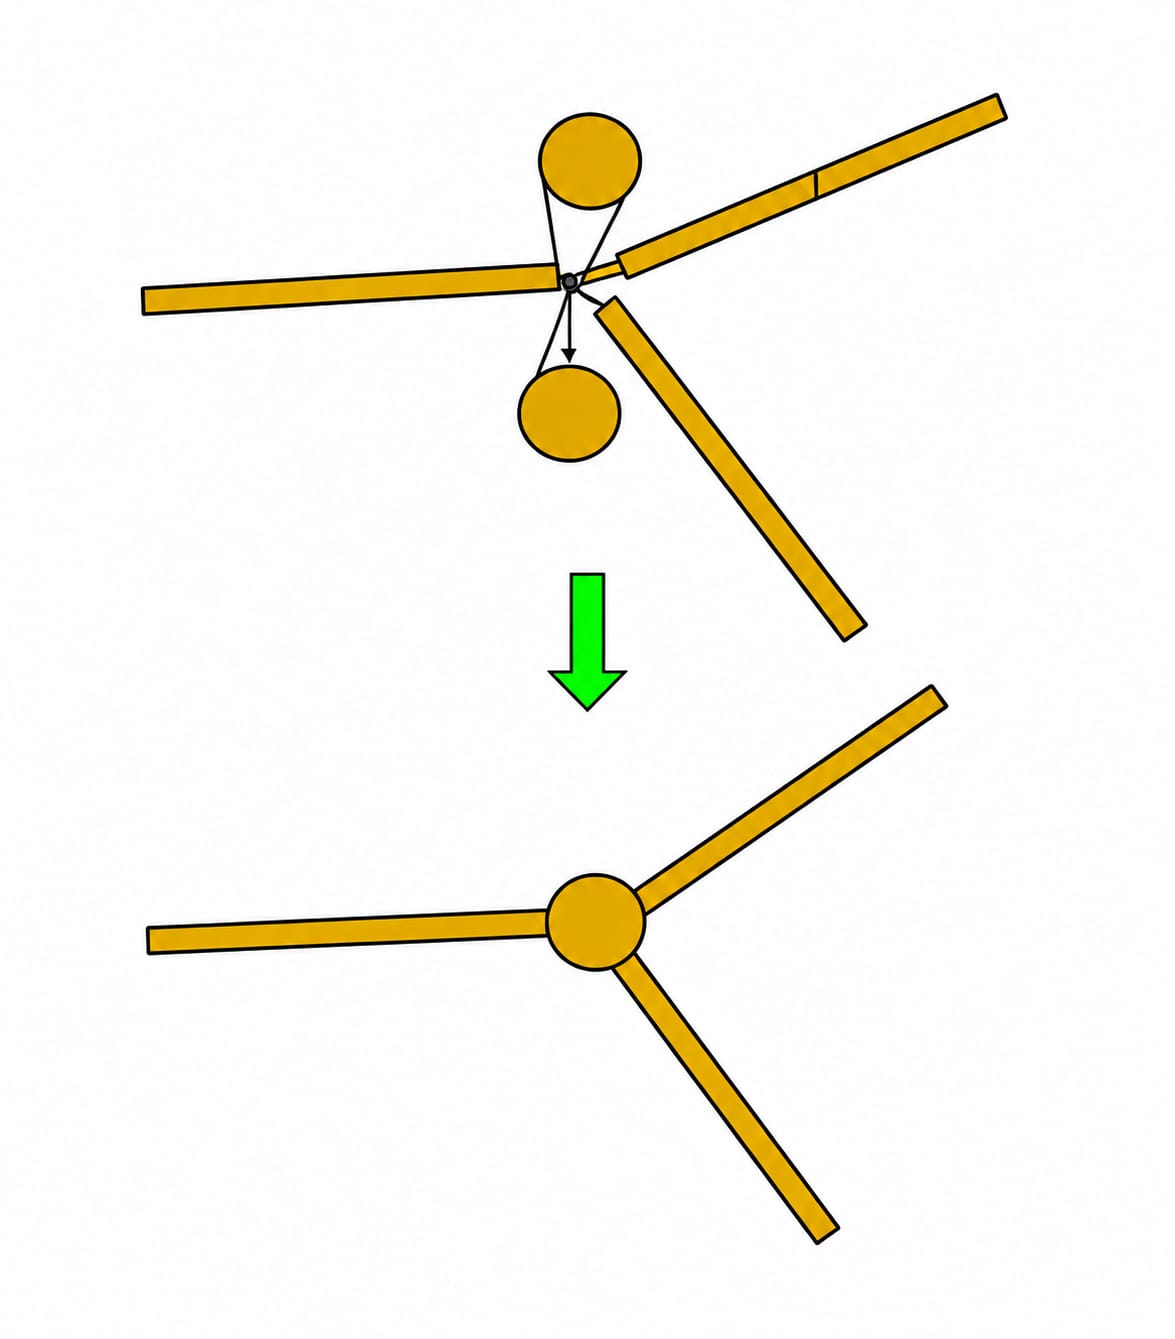
MAKE THE PROPELLER SHAFT

  • Take the two circles.
  • Take the three sticks measuring 17 cm ร— 1 cm each.
  • Connect the three sticks with the two circles.
  • Glue the pieces together to form the propeller assembly/shaft.
  • Make sure the assembly is properly balanced.

๐Ÿ’ก TIP

  • Keep the three sticks evenly positioned around the circles.
  • Make sure the propeller assembly is not too heavy.
  • Check that the shaft can rotate freely without touching the cardboard body.

๐Ÿ”„ ALTERNATIVE

  • Lightweight sticks or suitable lightweight material can be used if they provide enough strength.
  • Lightweight cardboard pieces can be used for the propeller structure if they can rotate freely.

Step 6. Make the Propeller Shaft

STEP 7

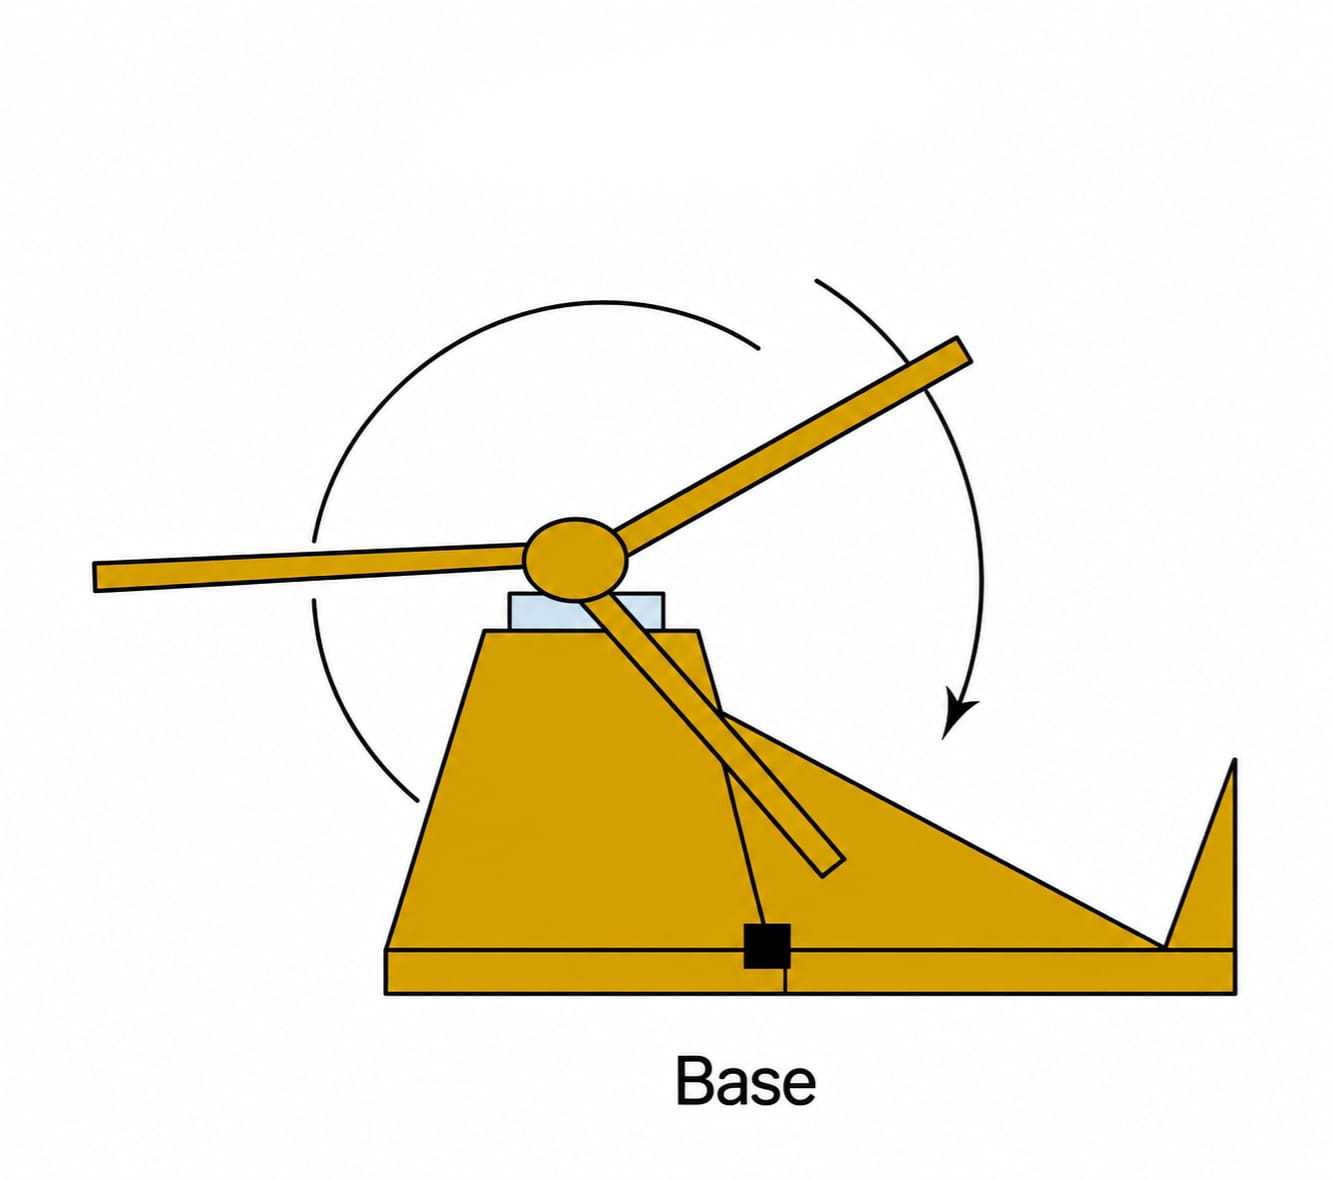
CONNECT THE PROPELLER TO THE MOTOR

  • Take the completed propeller assembly.
  • Connect it to the DC motor.
  • Secure the connection carefully.
  • Check that the propeller is aligned with the motor.
  • Make sure the propeller can rotate freely.

๐Ÿ’ก TIP

  • Do not apply excessive glue around the rotating part.
  • Check the balance of the propeller before switching on the motor.
  • Keep fingers, hair, and loose materials away from the propeller.

๐Ÿ”„ ALTERNATIVE

  • Additional lightweight cardboard support can be used around the connection if required.
  • Small cardboard reinforcement can be added to the fixed portion without blocking the rotation.

Step 7. Connect the Propeller to the Motor

STEP 8

TEST THE HELICOPTER

  • Connect the battery using the battery connector.
  • Make sure all connections are secure.
  • Keep the helicopter on a stable surface.
  • Turn the switch ON.
  • Observe the motor and propeller.
  • The motor should rotate the connected propeller.
  • Turn the switch OFF after testing.

Expected Result:

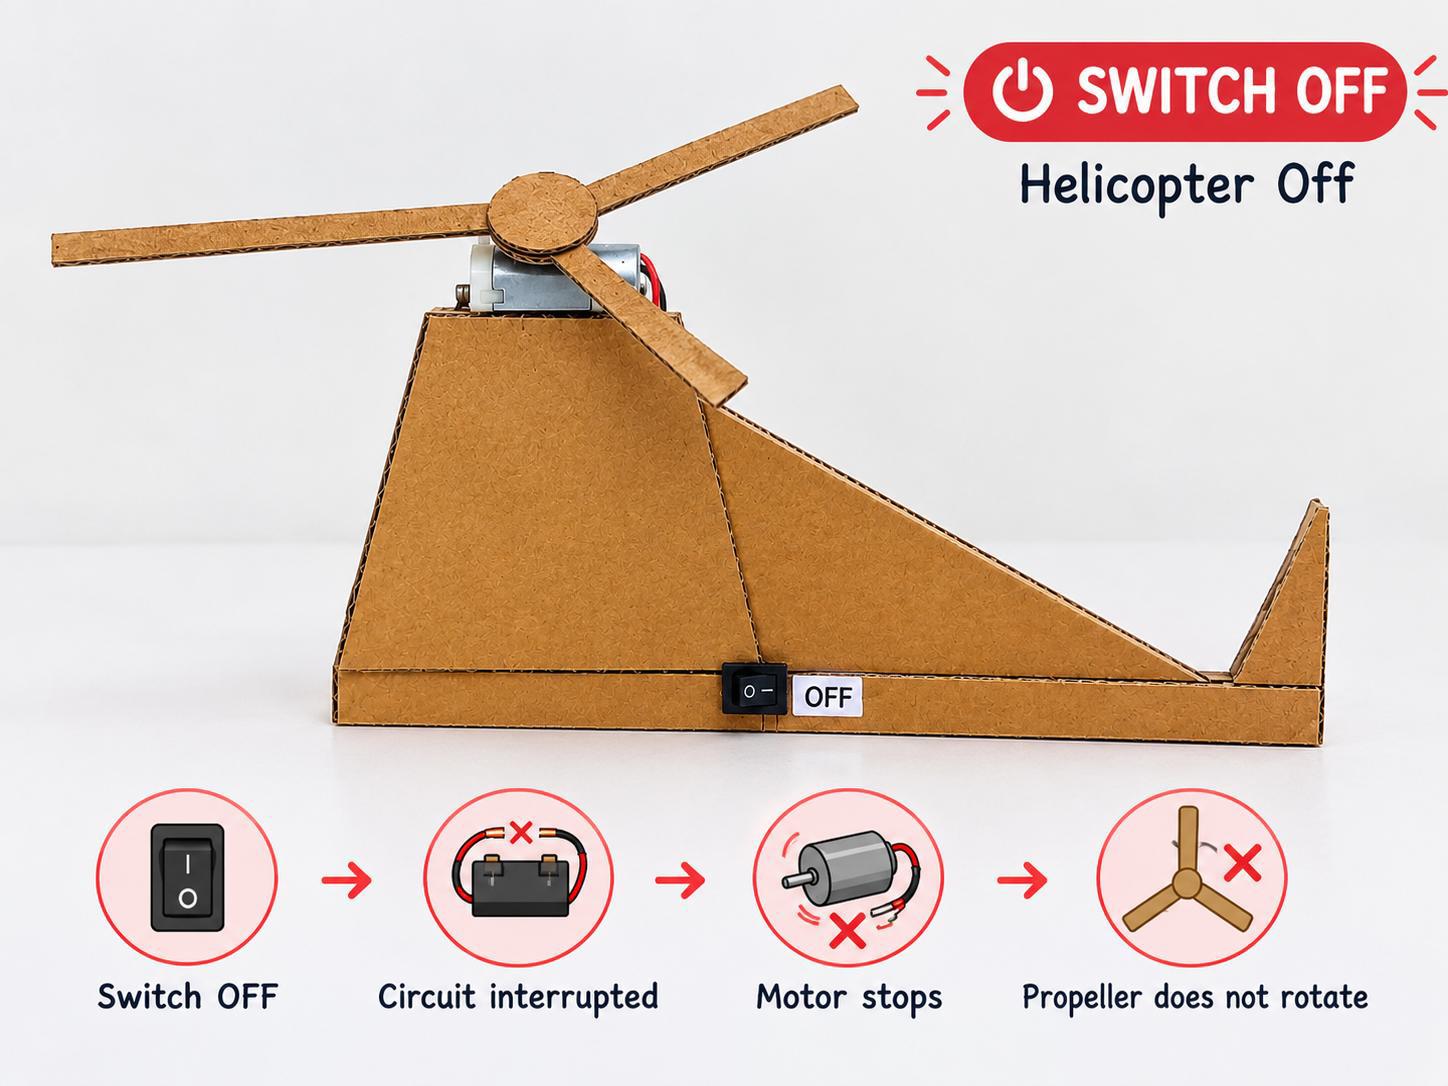
  • Switch OFF โ†’ Motor OFF โ†’ Propeller does not rotate.
  • Switch ON โ†’ Motor ON โ†’ Propeller rotates.

If the propeller does not rotate, check:

  • Battery connection
  • Battery connector
  • Switch connection
  • Motor connection
  • Loose wires
  • Propeller alignment

๐Ÿ’ก TIP

  • Perform the first test with the model placed on a stable surface.
  • Keep your hands away from the rotating propeller.
  • If the propeller does not rotate, switch OFF the circuit before checking the connections.

CIRCUIT DIAGRAM

Circuit Connection:

Battery (+) โ†’ Battery Connector โ†’ Switch โ†’ DC Motor โ†’ Battery (โ€“)

The motor is connected to the propeller shaft so that the motor’s rotation produces the rotational movement of the propeller.

WORKING PRINCIPLE

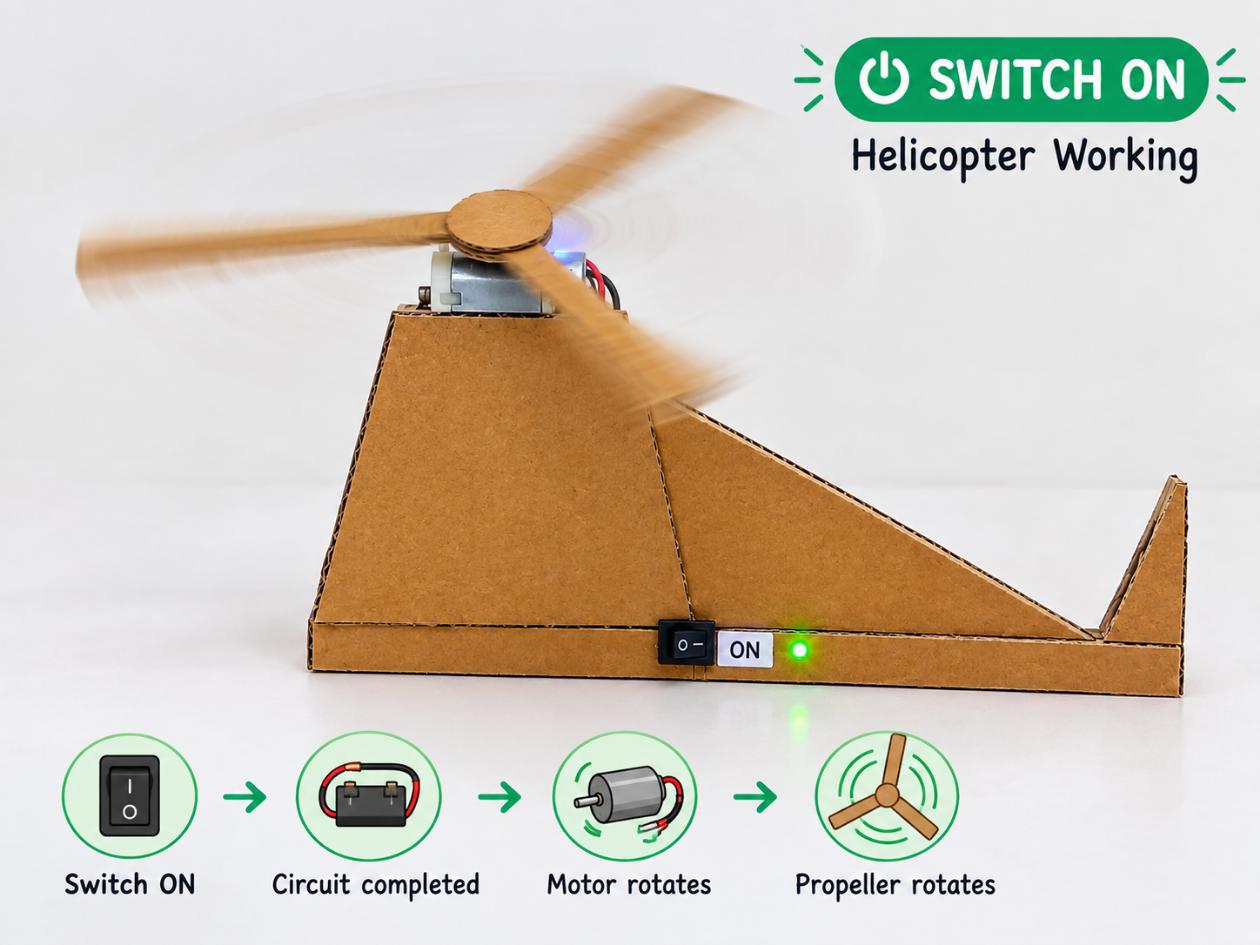
  • The Helicopter model works using a simple battery-powered DC motor circuit. When the switch is turned ON, the circuit is completed and electrical energy from the battery reaches the DC motor through the battery connector and switch.
  • The DC motor converts electrical energy into mechanical energy and starts rotating. The rotating motor turns the attached propeller shaft, causing the propeller to rotate.
  • When the switch is turned OFF, the circuit is interrupted. The motor stops receiving electrical energy and the propeller stops rotating.

Working Sequence:

Battery โ†’ Switch ON โ†’ Motor Rotates โ†’ Propeller Rotates

Switch OFF โ†’ Circuit Opens โ†’ Motor Stops โ†’ Propeller Stops

This project demonstrates:

  • Electrical energy
  • Current flow in a simple circuit
  • Switch operation
  • Battery connections
  • DC motor operation
  • Conversion of electrical energy into mechanical energy
  • Mechanical rotation of a propeller
  • Cardboard model construction

FINAL RESULT

  • A functional cardboard Helicopter model is created using a DC motor, battery, battery connector, switch, cardboard, and a propeller assembly.
  • When the switch is turned ON, the DC motor rotates the propeller, demonstrating the working movement of the helicopter model.

SAMPLE OUTPUT

(i) SWITCH OFF โ€“ HELICOPTER OFF

Switch OFF โ†’ Circuit interrupted โ†’ Motor stops โ†’ Propeller does not rotate.

Sample Output โ€“ Switch OFF / Helicopter OFF


(ii) SWITCH ON โ€“ HELICOPTER ON

Switch ON โ†’ Circuit complete โ†’ Motor rotates โ†’ Propeller rotates.

Sample Output โ€“ Switch ON / Helicopter ON

๐ŸŽฅ MAKER’S LAB VIDEO

Watch the Maker’s Lab video to understand how to build the Helicopter project and observe its working.

โ–ถ๏ธ Watch the Helicopter Project Video

ADDITIONAL NOTES

  • Always switch OFF the circuit before adjusting the motor or propeller.
  • Disconnect the battery before changing any wiring.
  • Do not connect the battery terminals directly together.
  • Make sure the motor and propeller are securely fixed before testing.
  • Keep loose wires away from the rotating parts.
  • Keep fingers, hair, and loose materials away from the rotating propeller.

SAFETY

  • Handle scissors and cutters carefully.
  • Ask an adult for help when using sharp tools.
  • Always switch OFF the circuit before adjusting the motor or propeller.
  • Disconnect the battery before changing any wiring.
  • Do not connect the battery terminals directly together.
  • Make sure the motor and propeller are securely fixed before testing.
  • Keep loose wires away from rotating parts.
  • Keep fingers, hair, and loose materials away from the rotating propeller.
  • Test the model on a stable surface and switch it OFF after testing.

CREATIVITY EXTENSION

  • Decorate the cardboard Helicopter with colours or sketch pens.
  • Add windows and doors to the helicopter body.
  • Add a helicopter name or label.
  • Add landing supports using cardboard.
  • Add labels for the battery, switch, motor, and propeller.
  • Create colourful patterns on the helicopter body.
  • Give the model a neat and attractive finish.

LEARNING OUTCOME

After completing this project, students will be able to:

  • Identify the basic components of a motor-powered model.
  • Understand how a battery supplies electrical energy.
  • Understand the function of a switch.
  • Understand the basic operation of a DC motor.
  • Connect a motor to a battery through a switch.
  • Understand how electrical energy is converted into mechanical energy.
  • Understand how a motor can produce rotational movement.
  • Assemble a simple propeller and shaft.
  • Use cardboard to build a functional working model.
  • Test a working model and identify simple connection problems.

Leave A Comment

Your email address will not be published. Required fields are marked *